Español
 عربى
عربى русский
Content
The Purpose of a Cable Manager
A Cable Manager is a hardware accessory designed to organize, route, and secure cables within a server rack or network enclosure. To use it, you simply route your Ethernet, fiber, or power cables through the designated horizontal or vertical channels, securing them with hook-and-loop straps or the integrated fingers to maintain proper bend radius and airflow. To install it, you mount the cable manager to the vertical mounting rails of your server rack using the included cage nuts and screws, typically occupying 1U (1.75 inches) of vertical space for horizontal managers or attaching to the side rails for vertical units.
The primary goal is twofold: to prevent signal degradation caused by tight bends or electromagnetic interference and to maximize cooling efficiency by eliminating airflow obstructions caused by tangled cabling. In high-density data centers, proper cable management can reduce cooling costs by up to 15% and cut troubleshooting time by over 50%.
How to Use Cable Manager: A Practical Guide
Using a cable manager effectively is more than just stuffing wires into a channel. It involves strategic planning to ensure scalability, serviceability, and network integrity. Below are the practical steps to utilize both horizontal and vertical cable managers.
Horizontal Cable Managers (1U or 2U)
Typically installed between patch panels or switches, horizontal managers act as the primary distribution point for front-side patching.
- Routing: Run patch cords from the switch port through the manager's front "fingers" or covered ducts. Ensure that cables exit the manager directly into the adjacent patch panel ports to minimize exposed slack.
- Bend Radius Protection: For fiber optic cables, ensure the bend radius does not fall below 30mm (1.18 inches). Use the designated spools or curved fingers provided by the manager to maintain this radius. Exceeding the bend radius can cause microbends, increasing attenuation by up to 0.5 dB per incident.
- Segregation: Separate copper (Cat6/Cat6a) cables from fiber cables to prevent physical stress and interference. Most managers have removable covers that allow you to create distinct zones.
Vertical Cable Managers (Finger Duct)
Vertical managers are mounted on the sides of the rack to handle bulk cabling running from top to bottom, connecting to switches, servers, or backbone infrastructure.
- Backbone Routing: Use the vertical manager to aggregate cables from multiple horizontal managers. Route cables from the front of the rack to the rear or side channels to connect to active equipment.
- Slack Management: Store excess cable length in the vertical manager rather than coiling it behind equipment. Studies show that proper slack management in vertical managers reduces airflow restriction by up to 20% compared to loose bundles.
- Labeling: Always label both ends of the cable before routing through the vertical channel. This reduces average Mean Time To Repair (MTTR) from 30 minutes to under 5 minutes for circuit tracing.
How to Install Cable Manager: Step-by-Step
Installation is a straightforward mechanical process, but precision is key to ensuring the structural integrity of the rack and the longevity of the installation. Whether you are working with a 4-post server rack or a 2-post network rack, the following steps apply.
Step 1: Determine Mounting Location
For horizontal managers, they are typically installed between active components (e.g., Switch in U1, Cable Manager in U2, Patch Panel in U3). For vertical managers, they mount to the side of the rack frame, often in pairs (left and right).
Step 2: Prepare the Rack Rails
Identify if your rack uses square holes (common for server racks) or threaded holes (common for telecom racks). For square holes, insert cage nuts into the designated mounting spaces. Ensure cage nuts are oriented with the spring clip on the inside of the rail to prevent slippage.
Step 3: Secure the Unit
Align the cable manager’s mounting brackets with the holes. Insert the mounting screws (typically M6 or 12-24) and tighten them hand-tight initially. Once aligned, torque them to a snug fit—over-tightening can strip the threads or warp the chassis, especially in high-density plastic units.
| Hardware Type | Recommended Torque (in-lbs) |
|---|---|
| M6 Screw (Square Hole) | 30 - 35 |
| 12-24 Screw (Threaded) | 25 - 30 |
| 10-32 Screw (Threaded) | 15 - 20 |
FAQ About Cable Manager: Addressing Common Concerns
Below are the most frequently asked questions regarding cable management, with precise answers based on industry best practices and manufacturing standards.
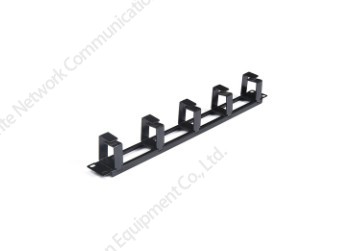
1. What is the difference between a "lacer bar" and a "finger duct"?
A lacer bar is a simple metal bar used primarily for securing bundles with Velcro, offering no individual cable separation. A finger duct (the standard Cable Manager) features individual "fingers" or rings that separate cables, providing superior bend radius control and allowing for individual cable moves without disturbing adjacent cables.
2. How much space should I leave between cable managers and active equipment?
Ideally, install a 1U cable manager directly adjacent (above or below) every patch panel or switch. For dense fiber installations, a 2U manager is often preferred. Maintaining a 1-inch (25mm) clearance in front of the manager doors ensures proper airflow for front-to-back cooling systems.
3. Can I use plastic cable managers for high-density fiber?
Yes, but you must ensure the plastic is flame-retardant rated (UL 94V-0). High-quality plastic managers, like those produced by Simante, are engineered to handle high-density fiber while maintaining structural integrity. In facilities requiring seismic certification, metal vertical managers are recommended due to their higher tensile strength (typically >500 lbs load capacity).
4. Do cable managers come in custom sizes?
Absolutely. As a professional manufacturer, Yuyao Simante Network Communication Equipment Co., Ltd. specializes in custom-made Cable Managers. With over 10 regular and customization production lines and 10 sets of fully automatic injection molding machines, we can produce managers in specific depths, colors (e.g., black, white, custom RAL codes), and materials to match your exact data center aesthetic and spatial requirements. Our facility maintains a stable annual output of more than 9 million units, ensuring scalability for large-scale deployments.
Why Quality Matters: Engineering and Support
Selecting a high-quality Cable Manager impacts total cost of ownership. Inferior units may feature sharp edges that damage cable jackets or plastic that becomes brittle over time. Simante's approach ensures that quality is guaranteed at the design source through a mature research and development system.
With a dedicated team of more than 10 engineers and over 30 full-time technical personnel, we focus on continuous improvement. Our factory utilizes 10 sets of fully automatic injection molding machines and 20 semi-automatic units to ensure consistency in critical dimensions, such as the spacing between fingers (typically 1.2 inches to accommodate high-density RJ45 jacks).
Simante provides specialized integrated solutions for customers to ensure it meets the customer's requirement. Whether you need a simple 1U horizontal manager or a complex custom vertical solution for a hyperscale data center, the advanced Cable Manager factory infrastructure supports your project from design to delivery.
- Production Capacity: 9 million+ units annually to support large-scale procurement.
- Automation: 8 automatic installed machines ensure consistent assembly quality.
- Customization: Complete network cabling solutions integrating design, development, sales, and service.
By investing in engineered cable management from a reliable manufacturer, you ensure that your network infrastructure remains scalable, serviceable, and efficient for its entire lifecycle.